
What does the Mailchimp Customer Journey mean versus classic automation? Well, the journeys are exactly what the name says. It’s a visual roadmap that allows you to plan out the journey you want your subscribers to take. I walk you through some of the basic setup features of a Mailchimp Customer Journey. It’s going to be a lot of fun. So let’s get started.
Getting Started
To get to the Journeys from your Mailchimp dashboard, you click on the map icon on the left navigation, which takes you to the Journeys Explore tab. To create a new Mailchimp journey, you click on the green Create button and click on the Customer Journey link. I’ll call my Mailchimp journey ‘Hey there, testing’. Make sure you select the appropriate list if you have more than one. Then click on the start building button.
Select a Starting Point
Immediately, you’re going to be asked to choose a starting point, and Mailchimp starts you off on the Popular tab. You can go through the different menu options and select the starting point you need for your customer journey. In my demo, I start with ‘signs up’, and Mailchimp provides me with some ideas. For example, Welcome new sign-ups, introduce your brand, and turn new contacts into new customers. After selecting your starting point, the next question asks if you want to include imported contacts. For my demo, I clicked on save starting point.

Now, you can have more than one starting point in a journey. You can also apply filters as if it were a segment, and you can allow contacts to match your starting point condition and your filter. Or you could say no filters. Click Save when you’re done.
Add a Tag
Now, the plus button is indicating that you need to add something after your customer subscribes. What do you want to happen once a person signs up for that audience? Your choices here are rules or actions. For this demonstration, I added a tag. Click the add a tag box to add it to our Mailchimp Journey. After you add the tag, click the box to add your tag. I will add the tag ‘eBook’. Click Save.

Create Your Email
After the tag, the next step is to send an email with the eBook that they signed up to receive. Select Send email. It asks, where do you want to apply this email? Before the tag or after the tag? Well, I’ll apply it after the tag. So I’ll click on the plus button below the tag in our journey. Now we have to go and create the email.

We’ll click on the box, and get an email. And it’s setting up the creative assistant, where we can select a template or use a previous campaign as a template. In our demo, I’ll use a previous campaign called the Fab Freebie Giveaway. Now, because I’ve already used this before, there’s not much in the design I want to do here because this is just a demonstration. After the email is set, click on the top right, save, and return to workflow.
So far, in my Journey setup, I have set a starting point. Whenever a person signs up, they will get a tag called eBook, and they are immediately sent an email with a button to download the eBook. So far, so good.
If-Else Option
Let’s put in an if-else. So I’ll select on if-else. Again, I get the prompt, ‘where do you want it’? I’ll click on the plus after the email step. An If/Else is a condition or conditional logic. I’ll click on add a condition. A while ago, I did a video on Mailchimp segments, how to set them up, and what they do. And if you remember, I described it as if-else. Well, that’s what this is exactly doing.
What I want to do here is if they opened the last email with the download freebie, then send them another email. Maybe after a few days.
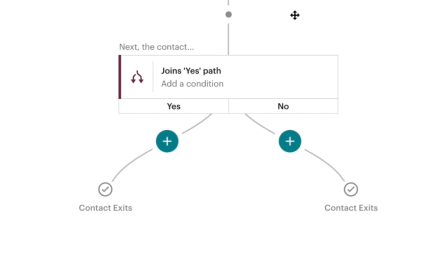
Let’s set this up.
The condition is campaign activity. I want to make sure that they open it. And the campaign that I’m looking for is the fab freebie giveaway download. Click Save. Now what happens is it’s a yes or no. Did they open it up? Then do this. If they didn’t, then send something else.

A couple of other things to point out. If you look down in the bottom left, it says view your journey settings. It gives you a name where you can change it, and it gives you a choice of marketing objectives.

Hi Larry,
I am currently on Mailerlite and many years ago, was on MailChimp. What I’m wondering is do these email providers slow down your website’s load speed and if so, which one has the least impact of the two?
Hi Cathryn,
Thanks for your comment. Unfortunately, I have no knowledge of Mailerlite but I can tell you adding a Mailchimp embed form has very little impact to load speed. The JavaScript that comes with the Embed code loads asynchronously. As far as using WordPress plugins for Mailchimp sign-up forms, again very little impact especially if you use a CDN along with a Caching plugin.
Thank you so much, appreciate your experience and knowledge! I’ve heard Mailerlite can be a resource hog, so good to know about MailChimp.